 Kids Snack Bars
 Soft-Baked Cookies
 Protein Bars
 Build A Box
 Shop All


Making fruit leather at home is way easier than you think. You just blend up some fruit into a puree, spread it super thin on a baking sheet, and let it dry out on low heat for a few hours. That’s it! This simple method turns fresh or even frozen fruit into those chewy, delicious snacks your kids go crazy for, and you get to skip all the added sugars.
The Secret to Snacks Your Kids Actually Crave
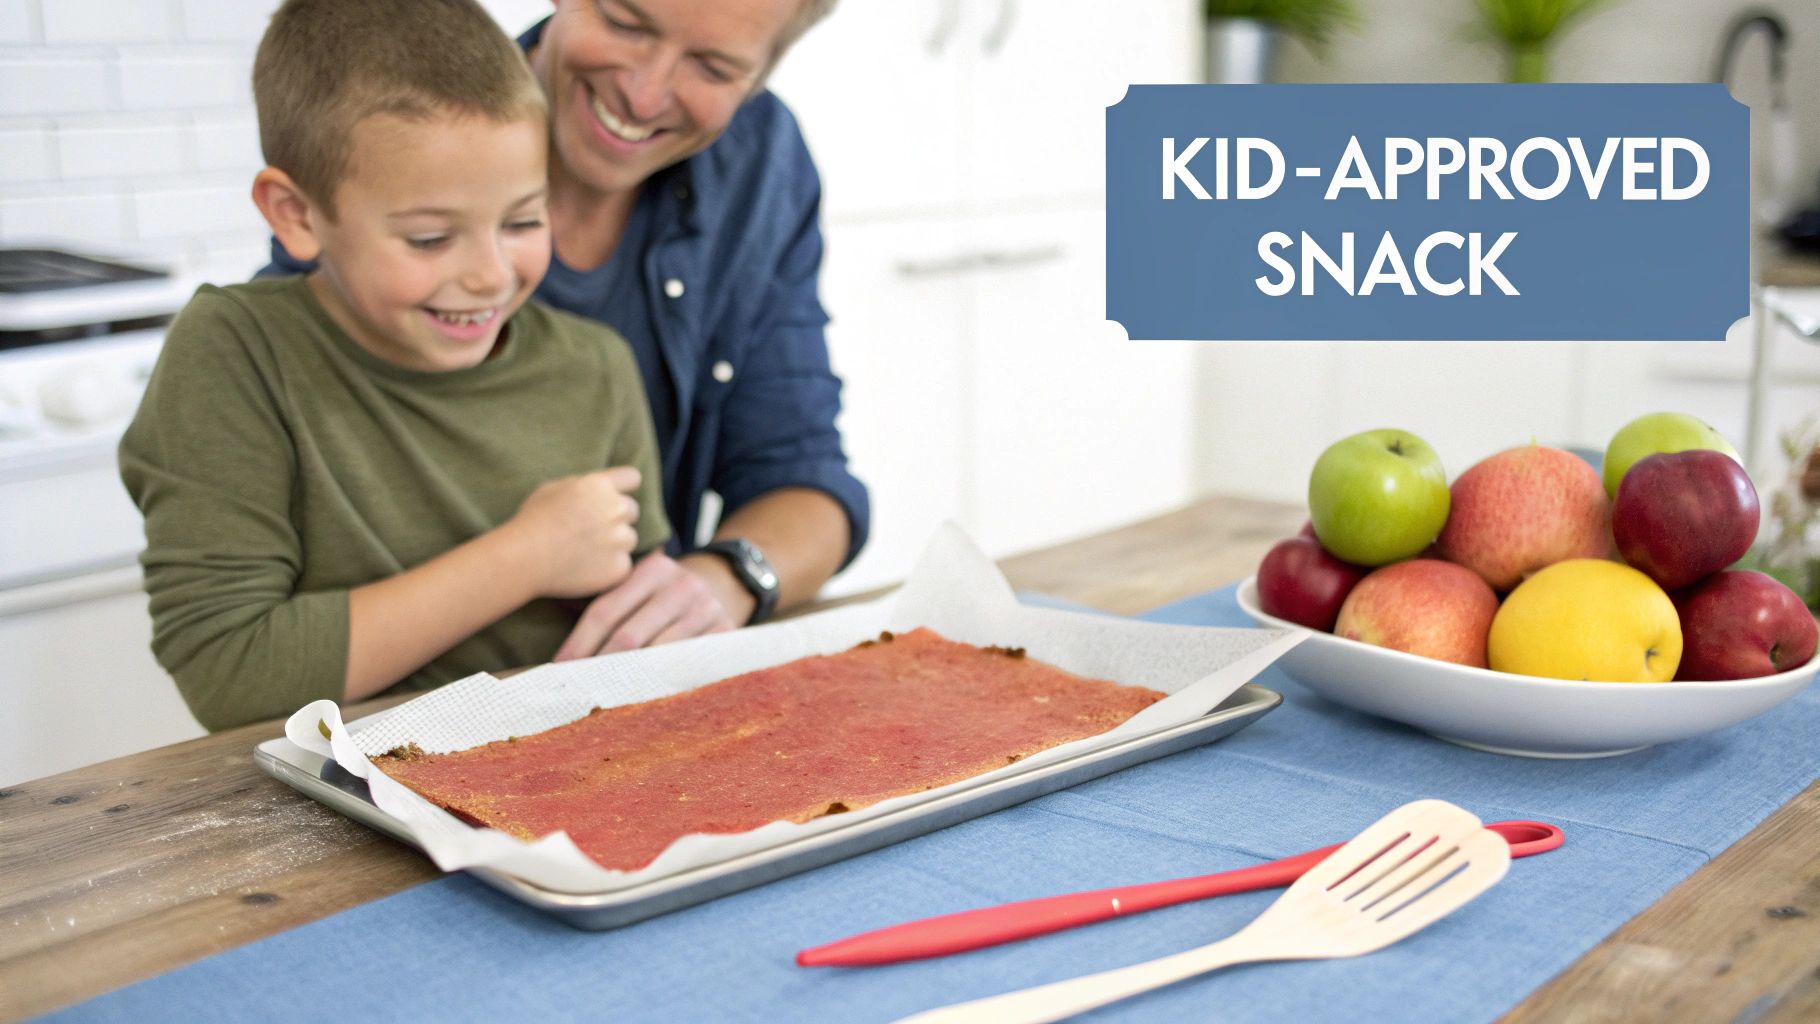
Let's be real: the snack aisle can feel like a total battleground. You’re hunting for something healthy, but your kids make a beeline for the brightly colored packages of kids snack bars and cookies filled with ingredients you can barely pronounce. It’s a constant tug-of-war to find a treat that makes everyone happy.
This is where knowing how to make fruit leather becomes your superpower. It’s not just another healthy snack; it’s a fun, vibrant, and delicious alternative that can actually go head-to-head with those store-bought temptations.
A Growing Trend for a Reason
This move away from processed snacks isn't just happening in your kitchen; it’s a massive shift. The fruit leather market is booming, expected to nearly double from USD 1.24 billion to USD 2.29 billion by 2033.
This surge is all thanks to health-conscious families looking for natural, clean-label alternatives. In fact, North America is leading the way, accounting for 38% of global sales as more and more parents prioritize better snacking options. You can discover more insights about the fruit leather market and its incredible growth.
So, forget the endless search for the perfect store-bought snack. You’re about to create a go-to treat that’s both parent-approved and kid-demanded, turning everyday snacking into something you can feel great about.
Alright, before we get to the fun part of turning fresh fruit into those chewy, delicious snacks your kids will devour, let's get your kitchen set up for success. We’re going to cover the simple tools you’ll need and—most importantly—how to whip up the perfect fruit puree. Getting this foundational step right is what separates good fruit leather from truly great fruit leather.
Think about all those kids' snack bars and cookies lining the grocery store aisles. So many are packed with fillers, weird sweeteners, and ingredients you can't pronounce. Your homemade version, though? It starts with one simple, beautiful ingredient: fruit. Nailing the puree ensures you’re building your snack on a base of pure, vibrant flavor.
Choosing Your Drying Method Dehydrator vs Oven
The biggest decision you'll have to make is how you're going to dry your puree. Both a food dehydrator and your trusty oven will absolutely get the job done, but they work a little differently. There's honestly no wrong answer here; it’s all about what works for your kitchen, your budget, and how often you see yourself making these.
A food dehydrator is a specialized gadget designed for one thing: low and slow drying. It circulates air at a super consistent, low temperature, which is pretty much ideal for creating evenly dried fruit leather without any crispy, overdone edges. If you think you'll be making fruit leather on the regular, or want to get into drying other things like herbs or jerky, it’s a fantastic investment.
On the other hand, your conventional oven is a perfectly capable alternative that doesn't cost a dime or take up any extra counter space. The trick is to set it to its lowest possible temperature—and you might even need to prop the door open just a crack to let moisture escape. It can be a little fussier to get the temperature just right, but it's a great way to try making fruit leather without committing to new equipment.
To help you decide, here’s a quick breakdown of what you can expect from each.
Choosing Your Drying Method Dehydrator vs Oven
A quick comparison to help you decide which appliance is best for your fruit leather-making adventure.
| Feature | Food Dehydrator | Conventional Oven |
|---|---|---|
| Temperature Control | Precise and consistent low temps, designed for drying. | Can be tricky; temperatures often fluctuate at the lowest settings. |
| Air Circulation | Built-in fan provides even airflow for consistent results. | Relies on natural convection; may create hot spots or uneven drying. |
| Energy Efficiency | Generally more energy-efficient for long drying times. | Less efficient, as it's designed for high-heat cooking. |
| Cost & Space | Requires purchasing a new appliance and finding storage space. | Uses an appliance you already own, saving money and space. |
| Best For | Frequent batches, perfect results, and drying other foods. | Occasional batches, trying it out for the first time, small kitchens. |
No matter which you choose, you'll be able to create amazing fruit leather. It really just comes down to convenience and consistency.
Pro-Tip: If you're using your oven, an oven thermometer is your absolute best friend. Most oven thermostats aren't super accurate at low temps, and a separate thermometer ensures you’re actually drying the puree at a gentle 140°F to 150°F instead of accidentally cooking it.
Mastering the Perfect Fruit Puree
Now for the best part—the fruit! The quality of your puree has a huge impact on the final product. You're aiming for a consistency that’s silky smooth, almost like a thick, pourable smoothie. This isn't just about taste; a perfectly smooth puree spreads more evenly, which means it will dry consistently without creating brittle spots or leaving behind gooey patches.
Here are a few secrets I’ve learned for getting it just right, every single time:
- Pick Your Players: Just about any soft, ripe fruit works beautifully. We suggest trying strawberries, peaches, mangoes, plums, and all kinds of berries. Ripe is key! In fact, if you have fruit that's a little too soft for eating fresh, it's absolutely perfect for puree.
- A Blender is Your Best Friend: A high-powered blender will make quick work of skins and seeds, giving you that coveted velvety texture. If your blender isn't as powerful, no worries—just push the puree through a fine-mesh sieve afterward to catch any lumpy bits.
- The Lemon Juice Trick: Add a tiny squeeze of fresh lemon juice—about a teaspoon per 4 cups of fruit—to your puree. This isn't just for flavor; the acid is a natural preservative that helps the fruit keep its bright, beautiful color and prevents it from turning brown as it dries.
Starting with a flawless puree sets you up for a delicious, healthy snack that will easily outshine anything you can grab in the snack aisle.
The Art of Spreading and Drying Your Leather
This is where the real magic happens. You’ve blended a vibrant, silky-smooth puree, and now it’s time to transform that liquid gold into the chewy, delicious snack strips your kids are going to absolutely flip for. Don't worry, this part is way less intimidating than it sounds, and mastering the technique is all about getting a feel for it.
Navigating the world of kids' snacks can feel like a full-time job. Between the endless aisles of brightly packaged kids snack bars and cookies loaded with things you'd rather avoid, finding a genuinely good option is tough. This process puts you back in control, turning simple fruit into a treat that's not just better for them, but more fun, too.
Nailing the Perfect Spread
The secret to perfectly even fruit leather that doesn't crack or have gooey spots? A consistent, even spread. You’re aiming for a layer that’s about 1/8-inch thick—think the thickness of a couple of credit cards stacked together. Too thin, and it will turn brittle and shatter; too thick, and the middle will never quite dry.
First things first, prep your canvas. Whether you're using dehydrator trays or baking sheets, you need a non-stick surface.
- Parchment Paper: Your trusty kitchen sidekick works beautifully. Just cut it to fit your tray.
- Silicone Mats: If you have them, they are fantastic for this. We suggest using these! They lie perfectly flat and create a super smooth surface for easy peeling later on.
Once your trays are ready, pour your gorgeous puree right into the center. Don't just dump it all at once; pour it slowly and steadily. Then, grab an offset spatula or even the back of a spoon and gently work the puree outward into an even rectangle. Make sure to leave about a one-inch border around all the edges, since they tend to dry faster and pull inward slightly.
Take your time with this step. A few extra moments spent getting the layer perfectly even will pay off big time with a uniformly dried, perfectly chewy final product. It’s the difference between a good batch and a great one.
This handy visual guide breaks down the simple journey from whole fruit to perfect puree, setting you up for success.
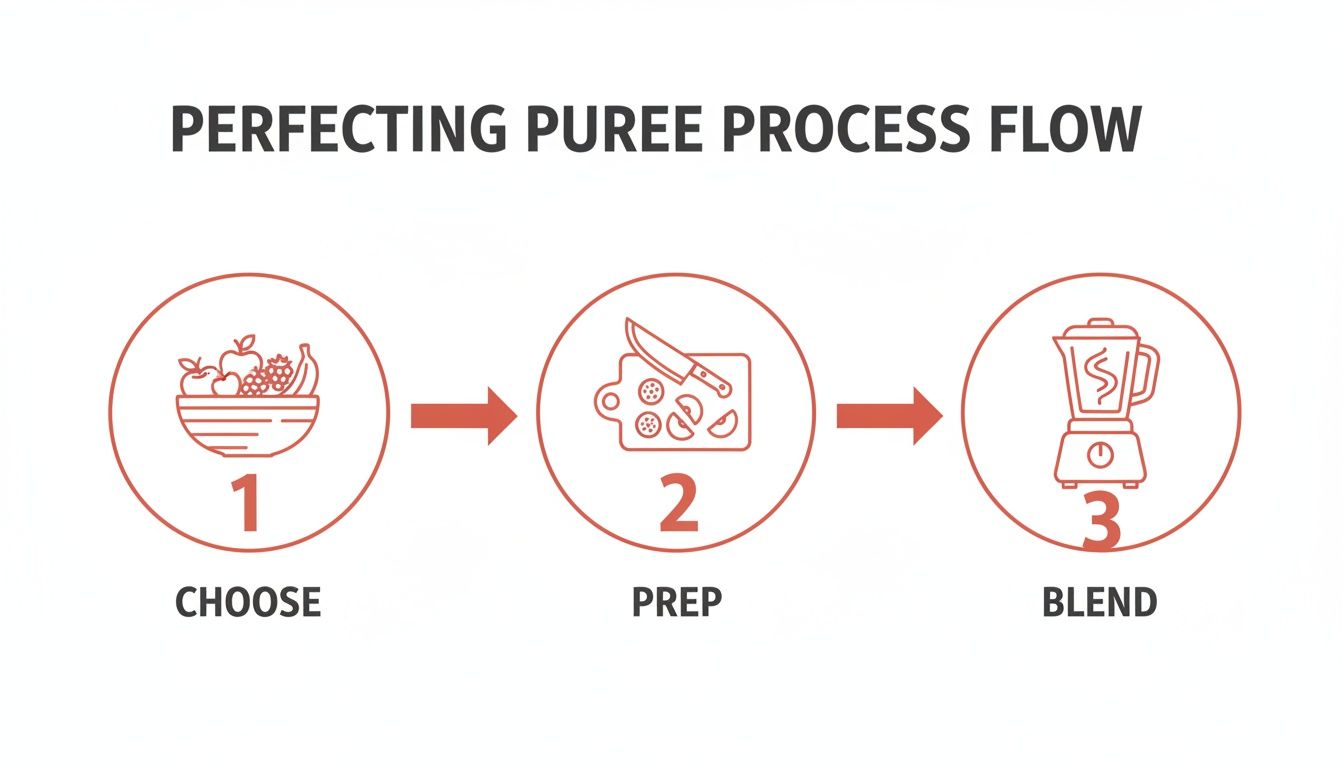
Following these simple stages ensures your base is flawless, making the spreading and drying process that much easier.
The Low-and-Slow Drying Game
Now, it’s time for the low-and-slow bake that turns your puree into leather. The key here is patience. You aren't cooking the fruit; you're gently dehydrating it to remove the moisture.
No matter your method, the goal is the same: a consistent, low temperature that allows the water to evaporate without scorching the natural sugars. The exact timing will depend heavily on the thickness of your spread and the water content of your fruit, but here are some solid guidelines to get you started.
Dehydrator Guidelines
- Temperature: Set your dehydrator to 135°F (or 57°C). This is the sweet spot for most fruits.
- Time: Plan for 6-12 hours. Start checking around the 6-hour mark, but don't be surprised if it needs longer, especially for wetter purees like peach or plum.
Oven Guidelines
- Temperature: Set your oven to its lowest possible temperature, ideally around 140-150°F (60-65°C).
- Time: This usually takes 4-8 hours. Prop the oven door open with a wooden spoon to allow moisture to escape, which is crucial for drying rather than baking. For more detailed tips, you can explore our guide on oven dehydrating fruit.
Knowing When It’s Done
Forget the clock—your eyes and fingers are the best tools for judging when your fruit leather is ready. Timers are just a suggestion; the real test is how the leather feels.
You'll know it's perfectly done when the surface is smooth and dry to the touch. It shouldn't feel wet or sticky, but it might be slightly tacky, like a perfectly rolled-out piece of fruit snack. Press your finger gently into the center. If it leaves an indent but your finger comes away clean, you’ve nailed it.
If you find it’s still gooey in the middle but crispy on the edges, your spread was likely uneven. Don’t panic! Just let it keep drying, knowing that next time you’ll focus on getting that perfectly consistent layer. This hands-on approach is what will make every batch you create a delicious success.
Crafting Flavors Your Kids Will Beg For
This is where you get to have some fun and play flavor scientist in your own kitchen. Forget the one-note fruit roll-ups from the store; you're about to create custom fruit leather that will have your kids actually raiding the pantry for something healthy.
Let's be real about kids' snacks for a second. The aisle is flooded with kids snack bars and cookies that promise nutrition but mostly deliver a sugar rush. When you make your own fruit leather, you take back control. You’re not just making a snack; you're crafting a treat that’s genuinely good and genuinely exciting.
Beyond the Basic Blends
Ready to move past just plain old strawberry? This is where the magic happens. Combining fruits not only creates more complex and interesting flavors but also gives you a brilliant way to use up whatever is ripe in your fruit bowl. Don't be shy about experimenting!
Some of our family's tried-and-true favorites include:
- Strawberry-Banana Swirl: It's a classic for a reason. This combo is naturally sweet, has a wonderfully creamy texture, and is a guaranteed hit with almost every kid.
- Cozy Apple-Cinnamon: This one tastes like autumn in a snack. We suggest using unsweetened applesauce as a shortcut base and adding a generous dash of cinnamon for that warm, comforting flavor.
- Tropical Mango-Pineapple: Bright, vibrant, and bursting with sunshine. This is our go-to for bringing a little taste of summer into a dreary winter day.
Don't stop there! Think about what your kids already love. Do they go wild for peaches? Try a Peach-Raspberry blend. Are they big smoothie fans? Recreate their favorite smoothie recipe as a fruit leather. The possibilities are truly endless.
Ready for some more inspiration? These pairings are a great starting point for your next creation.
Fun Fruit Leather Flavor Combinations
| Fruit Base (2-3 cups) | Flavor Pairing (1 cup) | Optional Spice or Add-In |
|---|---|---|
| Peach | Raspberry | Pinch of ground ginger |
| Pear | Blueberry | Splash of vanilla extract |
| Apple | Cranberry | Dash of nutmeg or allspice |
| Cherry | Banana | Spoonful of chia seeds |
| Plum | Orange (zest & juice) | Touch of cinnamon |
Mix and match based on what you have on hand—you might just discover your family's next favorite snack.
The Sweetness Dilemma: When to Add and When to Skip
One of the biggest wins of making your own snacks is getting to control the sugar. So many commercial snacks, especially kids snack bars and cookies, are shockingly high in added sweeteners. With this recipe, you're the boss.
Let the Fruit Shine: If you're starting with very ripe, sweet fruits like bananas, mangoes, or sweet cherries, you probably don't need to add any sweetener at all. The dehydration process concentrates the fruit's natural sugars, making the final product surprisingly sweet on its own.
Just a Little Boost: For more tart fruits like raspberries, cranberries, or certain types of plums, a little touch of a natural sweetener can balance things out beautifully.
A few great options:
- A drizzle of honey (for kids over age one)
- A splash of pure maple syrup
- A spoonful of agave nectar
Our suggestion is to start with just a tiny amount, taste the puree, and adjust from there. Remember, the flavor gets much more intense as it dries. If you're looking for other fruit-based treat ideas, you could even draw inspiration from something like a delicious Wild Berries Sorbet to dream up new flavor combos for your leather.
Nutritional Power-Ups and Fun Twists
Why stop at just fruit? A few simple add-ins can boost the nutritional value and add exciting new layers of flavor and texture. This is an awesome strategy if you’re trying to find healthy snacks for picky eaters who might be wary of new foods.
Here are a few ideas to get you started:
- Chia Seeds: Blend a tablespoon into your puree to add a fantastic boost of fiber, protein, and omega-3s without really changing the flavor.
- Ginger or Nutmeg: Just a tiny pinch of a warming spice like ginger or nutmeg can totally elevate flavors like apple, pear, or peach, giving them a cozy, sophisticated kick.
- Vanilla Extract: A small splash of pure vanilla extract makes almost any fruit blend taste richer and more like a special dessert.
This is your chance to turn a simple fruit snack into a powerhouse of flavor and nutrition. Get the kids involved, let them pick their favorite combos, and watch them beg for the healthy snack you made together.
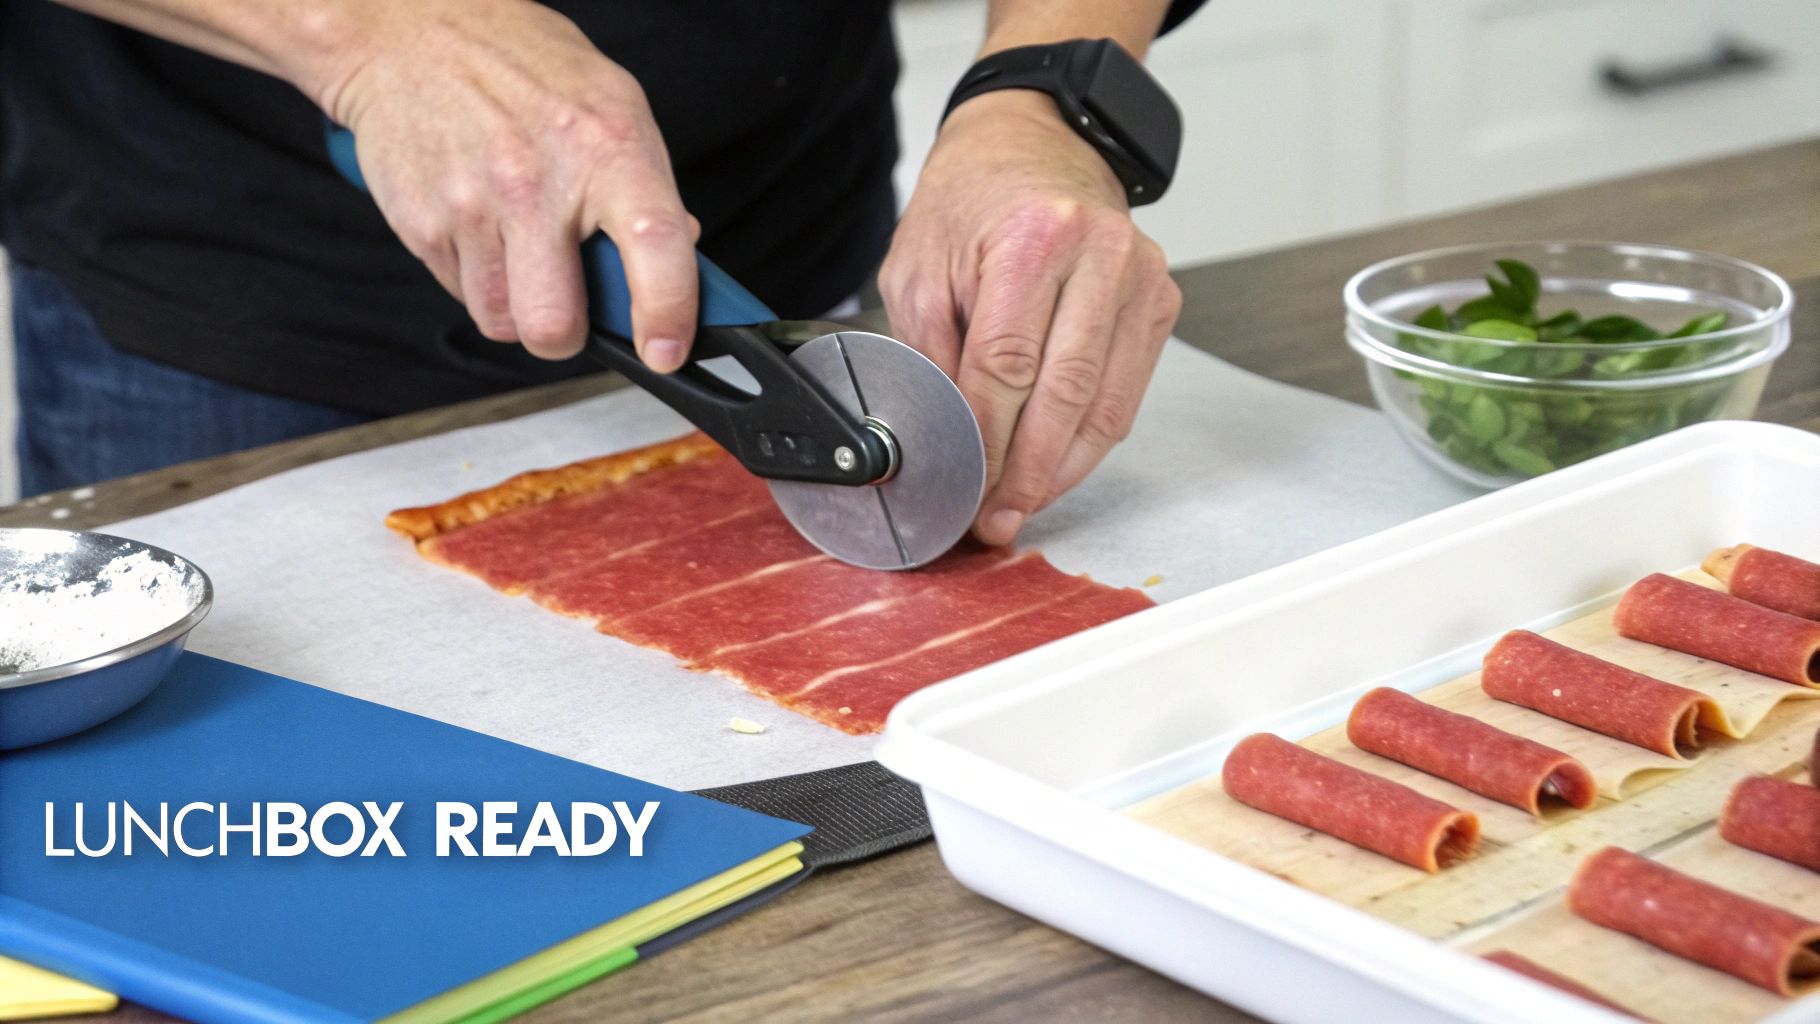
How to Cut, Store, and Pack Your Finished Treats
You did it! You’ve officially turned fresh fruit into sheets of gorgeous, chewy, delicious leather. Now for the really fun part: transforming those big sheets into grab-and-go snacks that will make your kids forget all about the other treats in the pantry.
Before you get started, let your fruit leather cool completely at room temperature. This is a crucial step that helps it firm up and makes it so much easier to handle. Just 20-30 minutes of patience now will prevent a sticky mess and guarantee clean, neat cuts.
Slicing and Rolling for Snack Time Success
This is the perfect moment to get your little sous chefs involved. There's something so satisfying for kids when they help prepare their own food, and this step is both safe and fun. Forget the sharp knives; we're breaking out the kid-friendly tools.
Two of the best ways to cut your fruit leather are:
- Kitchen Shears: A clean pair of kitchen scissors makes it incredibly easy to snip the leather into long, even strips. Kids can help with this under supervision, and they'll love the feeling of cutting through the chewy sheets.
- Pizza Cutter: This might just be the most fun option. A pizza cutter glides through the leather effortlessly, and kids have a blast rolling it across the sheet to create perfect snack-sized portions.
Once you have your strips, roll them into adorable little spirals. Just place a strip of parchment paper on top of your fruit leather strip and roll them up together. The parchment keeps the leather from sticking to itself and turns each one into a professional-looking fruit roll-up, ready for adventure.
This hands-on process does more than just prepare a snack; it builds a positive connection to healthy food. When kids help make something, they are far more excited to eat it—a huge win for any parent.
Storing Your Homemade Goodness
Proper storage is the key to keeping your fruit leather fresh, chewy, and delicious for weeks. Your goal is to protect it from its two biggest enemies: air and moisture. When exposed to air, the leather can get hard and brittle, which is the last thing you want.
After you've cut and rolled your snacks, place them snugly inside an airtight container. Glass jars with pop-top lids work wonderfully, but any container with a tight seal will do. Keep it in a cool, dark place like your pantry. Stored this way, your fruit leather will stay perfectly fresh for up to one month.
For a longer-term supply, the freezer is your best friend.
- Freezer Storage: Pop your airtight container into the freezer, and your stash will last for up to a year.
- Thawing Tip: Just let it sit at room temperature for a few minutes before eating, as it can be pretty firm right out of the freezer.
Packing the Perfect Lunchbox Surprise
Now you have a secret weapon for packing lunches and on-the-go snack bags. These vibrant, tasty rolls are a fantastic way to add a pop of color and a dose of fruit to any meal, and they hold up way better than store-bought kids snack bars that often crumble or melt. For more ideas, check out our guide on how to pack healthy lunches to complement your homemade treats.
If you've made a few different batches, consider adding a personal touch with custom food labels to identify flavors or note ingredients. It’s a great way to keep track of your delicious flavor experiments. Packing a homemade snack you crafted with care is a small way to show your love and ensure your family has the best fuel for their day.
Fixing Fruit Leather When It Goes Wrong
Let’s be honest, sometimes kitchen projects don’t turn out perfectly on the first try, and that's okay! Before you get frustrated, remember that even a slightly wonky batch is miles better than the ultra-processed snacks lining grocery store shelves.
Think of this as your friendly troubleshooting guide. Most fruit leather hiccups are simple to fix and even easier to avoid next time. Don't let a small mistake send you back to the snack aisle full of kids snack bars and cookies.
Why Is My Fruit Leather Sticky or Gooey?
If your finished fruit leather is still tacky to the touch or has a few gooey spots in the middle, the culprit is almost always moisture. This is by far the most common issue people run into, and it just means one thing: it needs more time to dry.
The fix is easy—just pop it back into the dehydrator or oven for another hour or two. We suggest checking on it every 60 minutes until the center is no longer tacky. Uneven spreading is another cause for this, so next time, grab an offset spatula and really focus on getting the puree to a consistent 1/8-inch thickness all the way across the mat.
Solving Brittle or Cracked Leather
On the flip side, did your fruit leather turn out more like a fruit cracker? If it's brittle, hard, or cracking as soon as you try to peel it, it was probably dehydrated for too long. Over-drying pulls out too much moisture, leaving it tough instead of chewy and pliable.
Spreading the puree too thinly from the start can also cause it to over-dry in a flash.
The perfect fruit leather should be pliable and smooth. It might feel a little tacky, but your finger should come away clean when you press it. Aim for that texture next time, and maybe start checking for doneness a bit earlier in the drying process.
Here's a little trick that can sometimes salvage a slightly over-dried batch: just let it sit out on the counter for a few hours. The natural humidity in the air can often help it soften up just enough to become bendable again. It's a simple last-ditch effort that has saved a few of my snack batches from the compost bin
Got Questions About Fruit Leather? We've Got Answers.
Diving into a new kitchen project always brings up a few questions. From wondering how long your creations will last to figuring out the best fruits to use, we’ve gathered answers to the most common queries about homemade fruit leather.
There’s something so rewarding about turning fresh fruit into a perfectly chewy snack, especially when you see your kids happily munching on something you made from scratch. It’s a feeling you just don’t get from grabbing another box of kids snack bars or cookies off the shelf.
Let's tackle some of those lingering questions so you can get started.
How Long Does Homemade Fruit Leather Last?
When you store it right, your delicious fruit leather has a surprisingly long life. Kept in an airtight container in a cool, dark spot like your pantry, it will stay fresh and tasty for about one month.
Want to make a big batch to last a while? No problem.
- In the Fridge: For longer storage, you can pop it in the refrigerator for up to six months.
- In the Freezer: To keep a stash ready for the whole year, freeze it for up to 12 months. Just be sure to wrap it well to prevent any moisture from getting in!
Can I Make Fruit Leather Without Sugar?
Absolutely! This is one of the best parts of making it yourself. If you’re using naturally sweet fruits like ripe mangoes, juicy summer peaches, or sweet cherries, you often don’t need to add a single drop of sweetener.
The drying process concentrates the fruit's natural sugars, so what starts as a mildly sweet puree transforms into a wonderfully flavorful and sweet snack all on its own. Trust the fruit!
What Are the Best Fruits for Making Fruit Leather?
You can use almost any fruit you can think of, but some definitely give you a better texture than others. Fruits with a higher pectin content—like apples, apricots, and most berries—are fantastic because they create a smooth, pliable leather that doesn't crack.
You can use fresh, frozen, or even canned fruit. Just make sure to drain canned fruit well and choose options packed in their own juice, not heavy syrup.
Here's a pro tip: blend a high-pectin fruit like applesauce with a lower-pectin fruit (think pineapple or kiwi). This is our secret weapon for guaranteeing a perfect, non-brittle result every single time.
At Skout Organic, we believe that snacking should be a joyful adventure full of simple, clean ingredients. If you love making wholesome treats for your family, you'll love our variety of kids' snack bars and cookies. Build your custom snack box today!